|
|
Post by 77eurobus on Jun 21, 2018 16:58:15 GMT -8
 Hi guys, I thought it would be fun to share some pics and info on my latest project. My 77 Euro bus is available. Contact me if interested. I purchased this bus in November from Don. I have never had a Westfalia and it looked like a worthy project. Bus has been unlicensed since 2002. Underneath is incredibly solid with no rust repair required. Some rust underneath the rear lights and on the front lower door area. Forgot the old battery tray needs replacement. Unbelievable how solid it is. The top components of the motor had been removed for gas tank replacement by Don. My wife and I discussed it and decided to give it a whirl. I was wary on the type IV engine costs but her excitement clouded my judgement a bit! The plan: 1. Detail and paint engine compartment, install fresh gas tank and cover. Install top end components and see if engine will run. (The major unknown) We are not sure why it was parked in the first place. 2. Paint and clean up pop top and components, replace with new canvas. Replace all foam cushions and order new plaid for all seats and bedding. 3. Remove and replace rusted areas, epoxy prime for now. 4. Replace front rotors, calipers, hard and soft lines and see if we have brakes. 5.clean and paint the wheels, get proper stock rated tires. 6. Clean and wire wheel chassis. 7. See if the large heater in the belly ban will fire up. 8. Drive it to 2018 Volksfest 9. Overnight in some local parks 10. Get painted over the winter Optomistic..... Very!!! |
|
|
|
Post by 77eurobus on Jun 22, 2018 19:25:44 GMT -8
Got the bus home and did and inventory of parts Don had with the bus. A very nicely restored fuel tank was included. Cleaned and paints the gas tank area and got new clamps and lines for the install. Even with the top of the motor components removed it Was a real bitch to install. The key was to lower the motor a couple of inches. Also trying to get the gas filler and associated tube to properly Line up was a trying experience. Probably had the tank in and out 6 times. Painted the grey cover and buttoned it up. Did a lot of research on the fuel injection components. So much to learn compared to a carb version. Started freakin out a bit because the motor was stripped down. I also purchased a mostly complete motor from Don that had all the FI components still installed. This turned out to be a great guide and later on donated some parts for the new build. 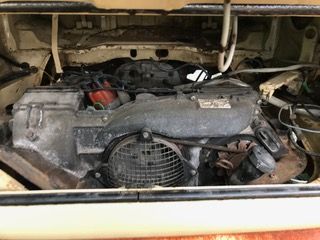 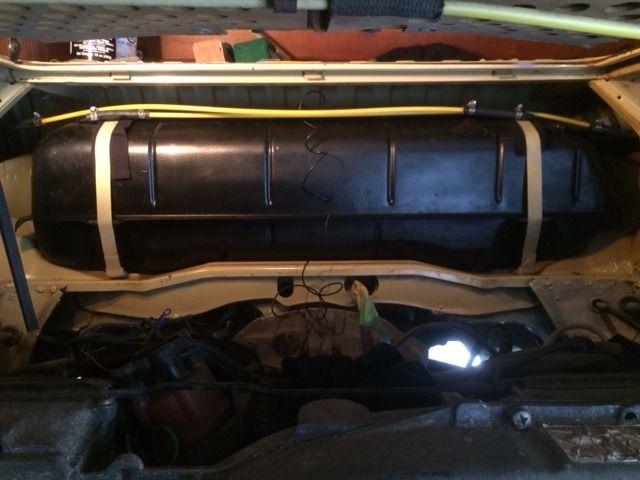 |
|
|
|
Post by 77eurobus on Jun 22, 2018 20:16:10 GMT -8
Next step was onto the motor. Fitted a new fuel pump and fresh lines from the tank. Feed and return lines. Once the fuel stuff was done I removed the existing fuel injectors. I tested the injectors on the bench with a 9volt battery and they all clicked and moved fuel with a little test rig I made. Expelling some fuel is a lot different than spraying out a beautiful pattern and this came back to bite me big time. Thinking the injectors were all good I proceeded to install all the FI components back. Took some time to get everything installed and the wiring. The next big project was the exhaust system. Never really dealt with the TYPE IV system before. I needed some pieces and Hightop Rob came to the rescue. He made some exhaust flanges and welded them on some f-pipes he had. The heat exchanger are painted up and seem to be in good shape for know. There very expensive to replace, $350.00 each side...yikes. I stripped some studs when removing the f-pipes so knew some head repairs were in my future. Finally got the exhaust on, hooked up the battery and checked for power and such. To my amazement all the lights worked, interior lights came on, door buzzer screaming away and the radio came on. F**ckin fantastic! Using a chopstick I moved the flap in the air cleaner and on came the fuel pump. Could not believe it! Dumped the engine oil and put new plugs in. Ran and got some gas and got ready for the big start. My son came up on the weekend to help and have another set of eyes on it. Turned the key and she cranked no problem. Would not fire at all. We had fuel but no spark. The points were closed when they should of been open. Got them dialed in and tried again. It would sputter and only really run if we put fuel down the plastic s tube. Had to regroup and think things through. Everything pointed to a bad or misadjusted air fuel meter. Spent a couple of days researching how to adjust it. Went head first and broke the seal on it and opened it. It's quite amazing to see the gears and how the meter works. God knows how they figured that out. We fiddled with it and managed to get the bus idling and revving up. It was awesome. We drove it up the street and knew things were not right. Engine compartment painted with engine . 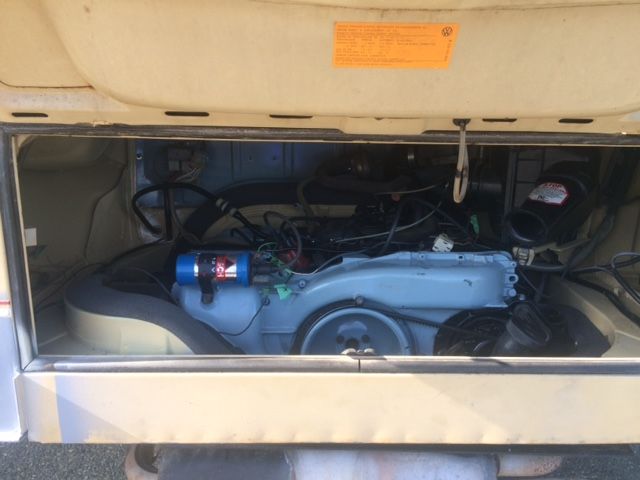 |
|
|
|
Post by tony on Jun 23, 2018 11:55:31 GMT -8
I don't think it will run well with a blue engine!  |
|
|
|
Post by Volktales on Jun 23, 2018 18:23:51 GMT -8
Fuel injection is great! Would take it over those nasty carburetors always! Going to be interesting to hear what problems you found. And you can always ask questions here, you know...
Also, any engine with hydraulic lifters needs some time before they all pump up properly. Assuming things were OK when it came off the road in the first place...
|
|
|
|
Post by 77eurobus on Jun 24, 2018 10:26:39 GMT -8
Motor is actually light grey, bad picture for sure. My initial thought was to get rid of all the FI and put on my set of kadrons. By this point I had learnt a ton about the FI and decided to keep going with it. Pulled the motor out to inspect the heads and do a total clean of the motor. Removed the heads and found damage on number cylinder 1 and on top of the piston. Nothing catastrophic but damage from detonation for sure. There are varied opinions on how to proceed with type 4 heads. Purchase new AMC heads, get originals rebuilt if possible or send brand new AMC heads off to Len Hoffman for a full rebuild of your new heads. I took mine to Thompson machining in Nanaimo, Fraser always does a good job and I hoped they could do the job. He found NOS exhaust valves and guides from California and did a great job. The heads looked great. I was going to purchase new pistons and cylinders. It "Donned" on me that I had a spare motor to look over. The extra motor I got from Don was pretty much complete but had a bad nose inside when turning over. Upon tear down I found the motor had one brand new AMC head and the pistons and cylinders were in great shape. The noise turned out to be an unbelievable amount of side play on the connecting rods! I decided to use the piston and cylinders on my existing motor. They are both 2.0 liter engines. After careful measuring and figuring out the deck height I got it back together. Had some screw ups on the way. Broke a ring when cleaning the pistons and ring grooves. Installed one piston backwards. Noticed the little arrow going the wrong way! Had to get some new tools, ring compressor kit was fine but my first set of circlip pliers from Canadian tire fell apart in my hands .So choked. Cleaned the block, painted all the tins and reassembled. New pushrod tubes and seals. As this was going together I though what a good time to get the injectors serviced. I took them to Loyd at Action Fuel Injection. He called 2 weeks later and said they were junk! He could not get any of them to spray. I was shocked and thankfull at the same time. He couldn't understand how the engine even ran at all. This explains a lot. All along it wasn't the air fuel meter at all. I should have done a spray test of the injectors while in the bus. Live and learn. Got new injectors from Bus Depot and finished building the motor. Used a motorcycle lift to pull and install the engine. Makes it a one man job. Love that thing. I had a spare AFM from Rob and used that for the first start try. Turned the key and it started right away! Had a high idle and then lowered itself as the auxiliary valve closed. How fantastic. Biggest issue has been the hydraulic valves. Initially I couldn't get them to pump up and then they would bleed down slowly throughout the week. It is a lot better now and settles down after 30 seconds or so. Driven it up and down the street and it has exceeded my expectations. This never happens to me! Its so smooth and quiet. 
|
|
|
|
Post by PICTUP on Jun 24, 2018 17:53:00 GMT -8
Barney's looking fantastic Jon!!! Very nice job and great to see him so together once again. It always tugged at my heartstrings every time I came up my driveway to see what I should be doing. But now you have accomplished what I could not and it warms my insides  Daljit, and Moe, would be happy too  |
|
|
|
Post by Volktales on Jun 24, 2018 20:05:24 GMT -8
Sounds like you have been learning lots of interesting things. I have never heard of side play in connecting rods causing noise before. The clearance specifications for those is generous, and they are not known for wearing out. Just so everyone knows, I still have many new piston rings available that were from part sets. So if you break one, I probably have a match. These were given to me, so will be passed on for free if anyone needs one or a few...
|
|
|
|
Post by 77eurobus on Jul 2, 2018 19:10:06 GMT -8
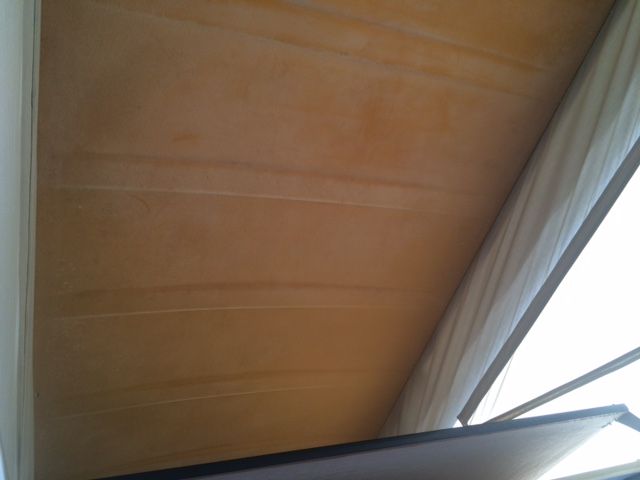
With the motor running well its time for the Poptop refresh. Removed the poptop and got it in the garage. First notable issues were the orange insulating flocking was filthy and there was a crack in the corner fibreglass. Got some fibreglass matt and resin and went at it. It came out really well and is super strong. I had to go to Richmond for the weekend and when I returned there was a great surprise. My wife had spent the weekend cleaning the poptop and the orange flocking material looks like new! (She wants to go camping real bad!) Flipped it over and painted it with white tremclad. I mix acrylic hardener in with the tremclad and it dries really nice. Purchased the black trim and seal kit from Bus Depot. Highly recommended. Easy to install and fit really well. The next process was to install the new canvas! Very exciting part of the build. Never thought I would get this far! The canvas was also purchased at Bus Depot. I made new staple strips and set aside a Saturday to do this. How about 3 days and a lot of frustration. Had the top off 3 times to finally get it right. The quality of the top is good but man what a tight fit. Lots of finicky details to think through and a major relief to finish. Enjoy the pics. 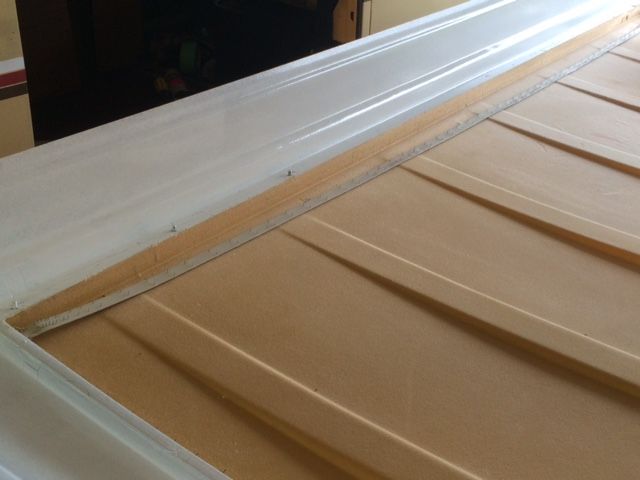 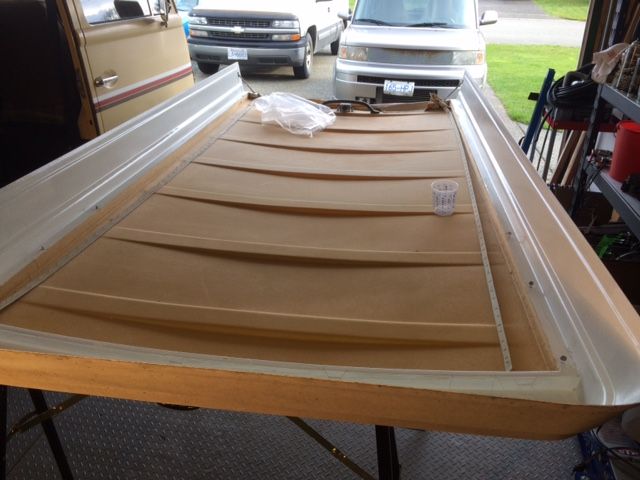 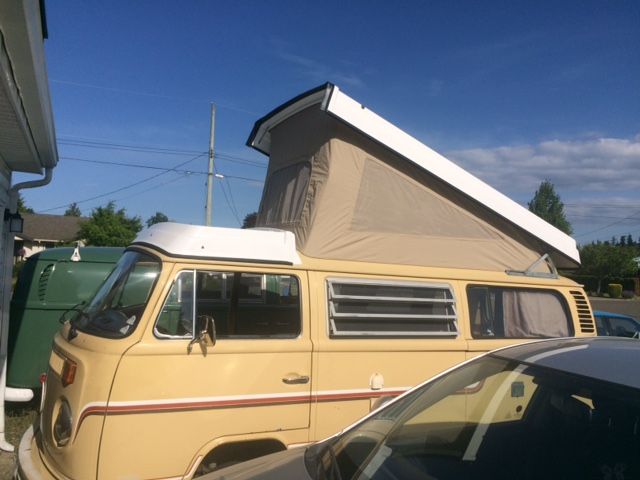
|
|
|
|
Post by busaddict on Jul 3, 2018 9:32:46 GMT -8
Wow! Barney is looking and sounding great! I met him last year over at Don's, I agree, it's nice to see him getting a resto. I'm lucky my '74 lacks the poptop flocking material, it must have been difficult to clean. Will we see Barney at Volksfest?  |
|


 Daljit, and Moe, would be happy too

